I’ve talked to several parents that use Facebook to share pictures and personal information, many are quite frightened of what they put out there and more importantly, who is able to see it.
Facebook has become quite complicated, that’s what happens when you try to give everyone everything. However it does have security measures in place to help you protect your information.
Privacy Settings
There are a lot of articles out there on “Privacy Settings”, if you haven’t read any, I strongly suggest that you look them up. This is probably the most important aspect to protect your data as it will determine what people will see from outside of your circle of friends.
However, since there are so many articles out there, most are better than what I can do, I will skip that and move on to something that I know very well: Friends Lists.
Edit Friends
At the top right corner of the Facebook website is a menu called “Account” with a down arrow beside it. This indicates that if you click on it, it will drop down to reveal more options.
Click on that and you should see a menu that looks like this:
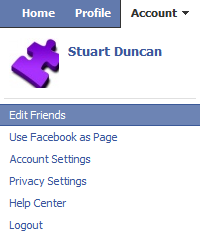
Click on the “Edit Friends” menu option to be taken to a page where you will now see a list of all of the friends you have. Also, on the left of that, you will see the lists available to separate your friends into.
Create a List

At the top, there is a Create a List button. Click on that and a new little box will pop up. This gives you the chance to name your list as well as pick people from your friends to put into that list.
I suggest creating lists such as Family, classmates, coworkers, Autism and FB Games. You can have way more, or not even use what I suggested. The options are yours. I suggest these for specific reasons that I will show you later.
Edit Lists

When you have your lists created and you’re looking at the page with all of your friends on it, you will see little “Edit Lists” menu options next to each of their names. You may have to put your mouse over the person’s name for it to appear.
When you see it, mouse over that Edit Lists text. If that friend belongs to a list or several lists, they will appear in a little black box next to your mouse cursor.
When you click on it, a box opens showing you all of your lists with checkmarks next to the lists that this friend belongs to.
From here, you can put people into one or more lists very quickly.
Using Facebook
Providing you read up on your Privacy Settings and you now have all of your friends tucked away into your lists, you are now ready to use Facebook with some peace of mind.
Here’s how it works.
When you do just about anything, whether it is setting your status, sharing a link, adding photos or just about anything else really, you will be able to see a little “lock” icon next to the action you’re taking.
By default, it should be set to “Friends Only”, if you mouse over it, it will tell you. It should look like this:

Once again, you should notice the down arrow. This means that clicking on it will offer you more options. So click on it before you do anything else.
Choose your friends wisely
Once you click on that lock icon, you will be given a new little box where the real power lies.
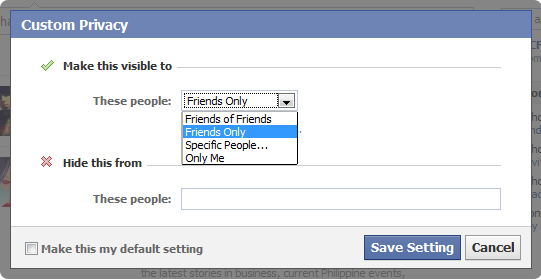
This box is divided into two. The top portion has people that CAN see what you’re about to share and the bottom portion has people that CAN NOT see what you are about to share.
The first thing you should notice is the drop down which allows you to choose if friends of friends can see what you’re sharing, if just your friends can see it, if only you would ever see it or.. my personal favourite, “Specific People…”
Specific People is what I ALWAYS choose. There’s almost never a time that I wish to share one thing with everyone but obviously everyone is different.
Once you select Specific People from the list, a new little box will appear for you to type in. As you type into this box, magic happens. As you type the name of a person, it will give you boxes that you can click on with your mouse to choose those people. The thing is, it works with lists as well.
As you type “F… A… M… “… the Family list will appear. Click on it and a blue box with the word Family will appear indicating that the only “specific people” that will see what you’re sharing are the people in your “Family” list.
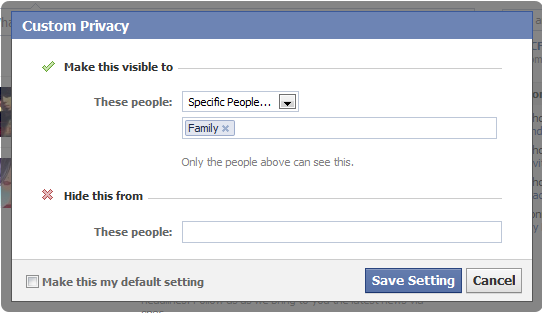
Once you’ve chosen the list(s) or friend(s) that can or can not see this, click on Save Setting and then proceed with sharing as you normally would.
There are some links and status messages that I wish to share with ONLY people that I know from the Autism community, so in those cases, I choose the Autism list. I play some games like CityVille… in those cases, when a game wants me to request things from people, or put something on my “wall”, I choose the “FB Games” list.
This way, none of my family or Autism people will never see CityVille requests. Likewise, family won’t be bogged down with Autism links that they likely won’t read.
Keep in mind, this exact same thing works with the “Hide This From” portion of the box. You can choose lists to exclude. So if you want everyone in your friends list to see something except your family… you can do that too.
Conclusion
Facebook is supposed to be about friends only, so sharing information shouldn’t be a problem… they’re all friends. But the simple truth is that even if you have nothing to hide, some people in your friends list simply don’t need to see what you’re sharing.
Sometimes though, you do want to hide some information from some of your “friends”. That’s just how life is sometimes.
Take the time to make your lists. Do it now before it becomes too big of a job. It’s easy to maintain because each time you add a new friend, you’re given the option to immediately put them into some lists.
Once you do this, all of those Autism links you share with Autism friends will never be seen by anyone that is not in your Autism list. All those family pictures will only be seen by family members. It’s as simple as that.
Final Word
Once you have all that done, and you’ve read those articles on Privacy Settings (you have read one, right?), you can now revisit your Privacy Settings and customize them.
Your lists will play a STRONG part in the over all privacy of your Facebook experience… not just what you share, but what people see in general.
For example, yes… if you enter your cell phone # into your details, it will be there for all to see. But not if you adjust your Privacy Settings. Go to customize, scroll down to the Contact section and click on the box next to Mobile Phone. Choose “Custom” and start picking the lists that can and can’t see your cell phone #.
It’s that easy, once you have the lists in place.
Your privacy is very important, your friends getting information thrown at them that does not interest them is also important to consider. For these reasons, you really should use Friends Lists on Facebook… and use them at all times!


